Edge AI with NVIDIA Jetson Orin Nano
This articel is to share our impressions of AI at the edge using NVIDIA’s Jetson Orin Nano Developer Kit.
AI, machine- and deep- learning became one of the most famous words in the last years. There are a lot of open-source projects out there which provides frameworks, models, and tools to work with.
Since we are focused on embedded software development we will have a closer look in a special area of the wide range of AI: AI at the edge.
In this article, we introduce training and usage of a pre-trained object detection model to detect and classify different visual objects.
We cover the following steps as a jump-start into the subject:
- Setup of hardware and software
- Test your installation
- Selection of an AI model
- Training the model with own images and object types
- Evaluation of training process quality
- Detect your objects in live video
What is “AI at the edge – Edge AI”?
At the edge, IoT and mobile devices use embedded processors to collect data. Edge computing takes the power of AI directly to those devices. It processes the captured data at its source – Instead of in the cloud or data center.
This accelerates the AI pipeline to power real-time decision-making and software-defined autonomous machines (1). Offline processing can leverage use cases, not possible with cloud based services.
Hardware
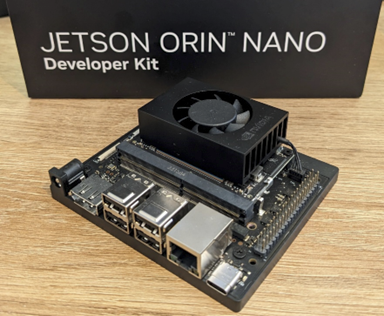
- NVIDIA Jetson Orin Nano Developer Kit (8GB Module)
- Ubuntu Host
- USB Web-Cam
Quick-start Developer Kit
At the time of writing JetPack version 6.x is released as a developer preview only. We use JetPack version 5 for this tutorial:
- NVIDIA JetPack SDK 5.1.3
- Ubuntu host version 20.04 (Ubuntu 18.04 or 20.04 can be used with Jetpack 5.x.)
Note: The Ubuntu host version depends on the NVIDIA JetPack version! Checkout compatibility list at https://developer.nvidia.com/sdk-manager.
There are two alternatives to get the dev-kit ready to use:
- SD-Card image from NVIDIA:
- NVIDIA SDK manager:
- https://developer.nvidia.com/sdk-manager
- A more detailed description can be found here: https://docs.nvidia.com/sdk-manager/install-with-sdkm-jetson/index.html
We used installation in the SDK manager.
Note: The host Linux for initial installation with SDK manager must have native access to the USB port connected to the development board. Installation from WSL is not officially supported and needs some tricks. The USB programming device changes function during the installation process. Once programmed, working with WSL host is possible.
Hello AI world
Thanks to Dustin Franklin from NVIDIA and the contributors providing the https://github.com/dusty-nv/jetson-inference repository (3). This repository contains all we need to get started with real-time object detection on the jetson.
How to setup the system is described here: https://github.com/dusty-nv/jetson-inference?tab=readme-ov-file#hello-ai-world
It doesn’t matter if you follow the docker container or the building project from source approach. We decided to build the project from source: https://github.com/dusty-nv/jetson-inference/blob/master/docs/building-repo-2.md
After successful installation you should be able to run the examples. We want to run the “detectnet” example which, by default, uses a pretrained SSD-Mobilenet-v2 model for object detection.
To see live camera detection, you can either attach a monitor to the jetson or start the application via ssh and stream the output to your host system via RTSP.
detectnet /dev/video0 rtsp://@:8554/my_stream
Where /dev/video0 is our USB Web-Cam. Also, we provide a port and name for our network stream. To open the network stream from our host we use VLC player (5). The network address would be: rtsp://192.168.178.128:8554/my_stream. Of course, you need to change the IP address to your actual address.
Now you can move your camera around and see what objects could be detected.
Once, we are here, everything is well prepared, and we can start on our own detection project.
Re-training SSD-Mobilenet
We want to re-train the SSD-Mobilenet model to distinguish five embedded boards. The following steps are necessary:
- Collect data
- Annotate the Image-Set
- Split into Training- Validation and Test-Image-Set
- Run training
- Evaluate the training result
Collect Data
Important rules for data collection to create a model that is robust to noise and changes in environment:
- Varying object orientations
- Camera viewpoints
- Lightning conditions
- Different backgrounds
We collected about 180 pictures. These consist of pictures showing one board or several. Of course, this low number of pictures is usually not enough but it always depends on your use-case and what you want to achieve. For our purpose of this tutorial, it was sufficient.
Annotate Image-Set
This is the most time-consuming part because we need to do it by hand. There are various annotation tools available out there (open-source, paid, online, offline, …). It highly depends on your actual use-case and your resources which approach fits best and what tool to use:
- Single person or team (simultaneous working) doing the annotations
- Annotation format (not all tools can export in all formats, e.g. Pascal VOC, COCO, YOLO, …)
- Auto-Annotation (pretrained model with a subsample of our dataset to annotate the rest of the dataset)
We tried a few tools and finally found CVAT to be one of the best for us. (4)
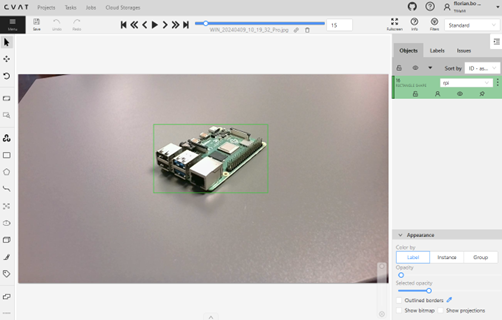
Once finished with annotations we need to export the dataset. The most compatible format when working with the training script provided by the jetson-inference repository is Pascal VOC!
Split into Training-, Validation- and Test-Image-Set
What is the difference between those sets? In short:
The Training-Set is used to train the model (learn the features). The Validation-Set is used after each epoch to validate the model performance during training (moved in the right direction?). The Test-Set is used to test the model after completing the training (How well does the model perform?).
There are many guidelines and suggestions how to split the dataset. We split our export into 70-20-10 percent (training-validation-test).
So, we create three sets of annotated images from our original 180 images:
- Training: 126 images
- Validation: 36 images
- Test: 18 images
Let’s train!
Now all the preparations are done, and we can finally start our training. We use the script from the repository located in python/training/detection/ssd. You could run the training on the Jetson Developer Kit board directly (which is fairly slow), or use the Ubuntu-Host or WSL (which is much faster depending on your hardware and/or graphics card).
We used a WSL distribution for training (Windows Subsystem for Linux).
Start the training with:
python3 train_ssd.py --dataset-type=voc --data=data/board_detector/ --model-dir=models/board_detector/ --epochs=500
For more information about the training and arguments to pass please refer to this documentation: https://github.com/dusty-nv/jetson-inference/blob/master/docs/pytorch-collect-detection.md
In our setup, the training duration (with additional parameters –batch-size=32 and –workers=10) was 2h16m.
Evaluate the training result
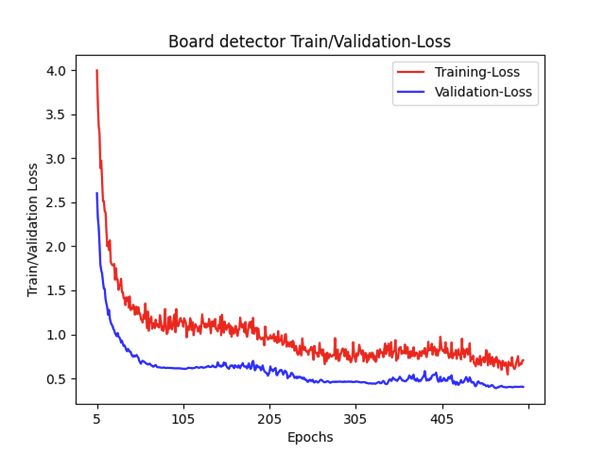
There are two main metrics which can be used to determine how well (or bad) our model is doing: Training- and Validation-Loss. First is used to assess how our model fits the training data. Second how good is it on the validation-set.
In an optimal case (good fit) the both graphs will intersect at some point with Validation-Loss slightly higher than Training-Loss.
Our training result does not show any intersection point. Also, the Validation-Loss is always higher than the Training-Loss. A reason for this could be that the validation-set may be easier for the model to predict compared to the training-set.
Nevertheless, let´s try to run our trained model on the Jetson Developer Kit:
detectnet --model=ssd-mobilenet.onnx –labels=labels.txt --input-blob=input_0 --output-cvg=scores --output-bbox=boxes /dev/video0 rtsp://@:8554/my_stream
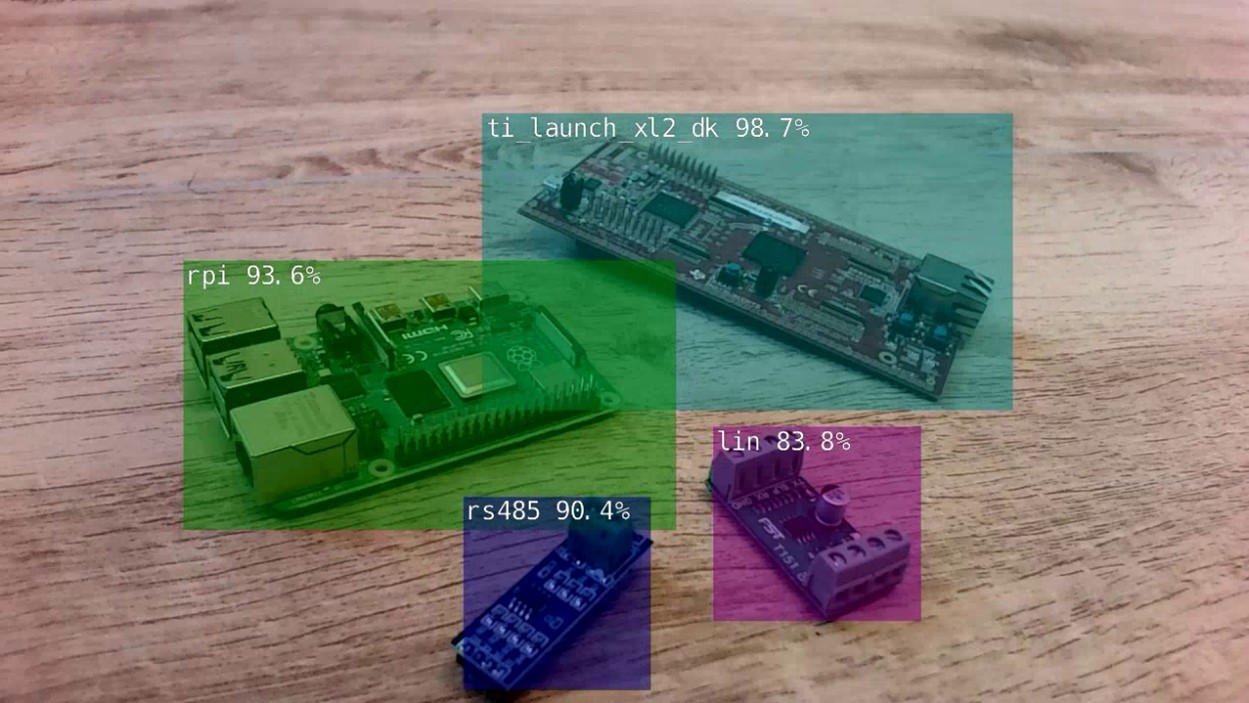
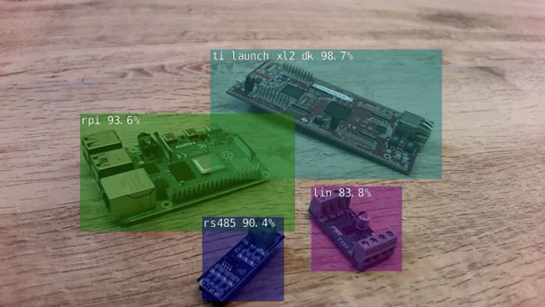
The detection result with overlays for the detected objects is shown below:
Conclusion
Our trained model yields quite good results and can detect all of the boards. Of course, there are still miss detections and, if the camera viewpoint is not optimal, it sometimes detects nothing.
Of course, there is room for improvement. We could expand the Image-Set with more varied backgrounds and viewpoints, perform more training, …
Neueste Kommentare